How to Solve Different Types of CAPTCHAs Using CapMonster Cloud and ZennoPoster
Detailed instructions for using the integration of two powerful and effective tools to automate any of your tasks
Both users and developers often spend a lot of time on the Internet, performing monotonous and routine actions. For fast and effective work, you can automate all these processes, including solving various captchas. However, in the process of automating this task, many obstacles and questions may arise, the main one of which is how to solve this or that problem when skipping protection against bots, which does not stand still and becomes more and more complex. With two very easy-to-use tools, you can forget about these obstacles. At the same time, you don't need to have serious knowledge of programming languages and spend a lot of time writing code. ZennoPoster has a graphical interface for creating actions. All you need to do is customize the template correctly for your specific tasks, and your own project will be ready to launch!
In this article, we will review ZennoPoster and CapMonster Cloud, methods of its integration, explain settings and write a template for auto-solving different types of captchas, show real examples, and also give tips and recommendations for ensuring the reliability of integration and process optimization.
Review of ZennoPoster and CapMonster Cloud
ZennoPoster is an entire development software package that has long established itself as one of the best tools for automating a wide variety of actions on the Internet, such as creating accounts, parsing, filling out forms, or just browsing pages. It emulates the work of a human and even an entire team. Whatever you do every day on your own, it can do for you.
CapMonster Cloud is a service for automatically recognizing and solving almost all types of captchas. Unlike manual recognition services, CapMonster Cloud solves captchas using machine learning, that is, using a neural network that is constantly trained and updated. It helps to save time and money, because with this method captchas are solved faster and cheaper than using manual labor.
Integrating these two powerful assistants increases the speed and success of your workflow, while saving you time for other tasks. You don’t need to do a lot of preliminary preparation and setup, you don’t need to write a lot of code, the program is designed so that an average user can handle it. Your bots will be able to solve captchas like a real person, including ReCaptcha v. 2, ReCaptcha v. 3, and even the “complex” Turnstile.
So, let's start setting up ZennoPoster/Project Maker and CapMonster Cloud and connecting them with each other.
Setting up CapMonster Cloud and ZennoPoster
First, you need to download ZennoPoster to your computer (only the Windows operating system is supported, all information can be found on the official website https://zennolab.com/en/products/zennoposter/), create an account, purchase the full version, and then create CapMonster Cloud account:
- Go to the https://capmonster.cloud/en/ website, click the “Sign in” button, registrate via email-password or using an existing Google account;
- You will see a control panel with your personal area for managing your account, API, balance, etc.;
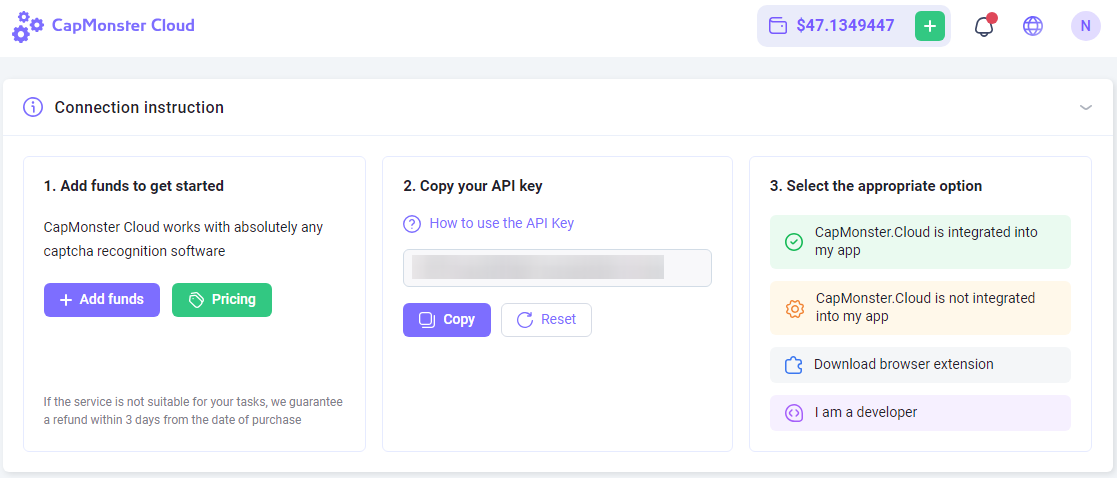
- Add funds to your balance (minimum $1), you can easily find all information about prices and recognition speed on the page;
- Copy the API key.
Now you need to go to ProjectMaker, open “Settings” on the home page and select the “Captchas” tab. Select the captcha recognition module - CapMonster Cloud, and enter your copied API key in the “Secret key” field. Restart the program. Now in the default settings you have the CapMonster Cloud module selected, it displays information about your CapMonster Cloud account and its current balance:
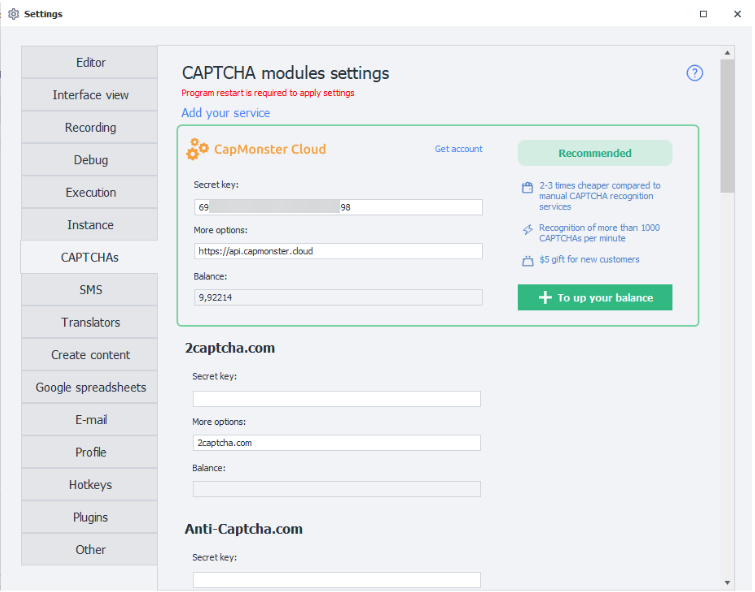
The connection between CapMonster Cloud and ZennoPoster is completed. Now you can immediately select and use this module with your API already specified in your actions.
Solving captchas with examples
ReCaptcha v.2
Let's create a small template for automatically solving captcha. Let's start with ReCaptcha v.2. ProjectMaker has a ready-made “action” for solving this type of captcha, which we will use now. To solve various captchas, you can also use HTTP requests; we will discuss this method later.
- Open ProjectMaker, create a New Project;
- Disable action recording, add the “Clear cookies” action;
- As a test, we will use the demo version of ReCaptcha2 from Google. Add the “Go to page” action, enter the following URL in it: https://www.google.com/recaptcha/api2/demo;
- Run the project, the built-in browser will open such a page:
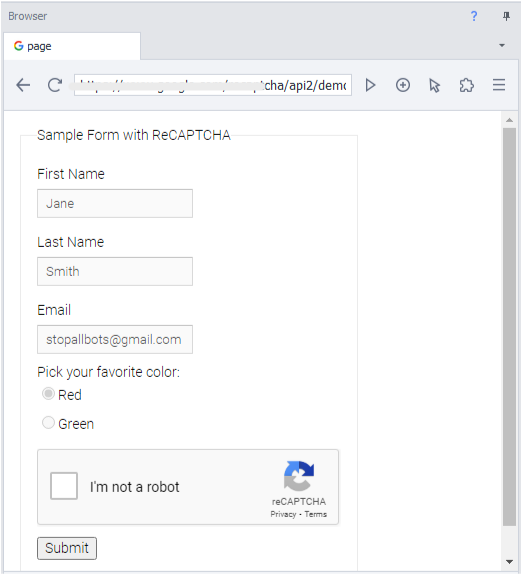
5. Right-click on the empty square next to the inscription “I’m not a robot”, select the action “To the action designer”, click “rise”, the “click” event and add to the project;
6. Next, add the “Recognize Recaptcha” action:
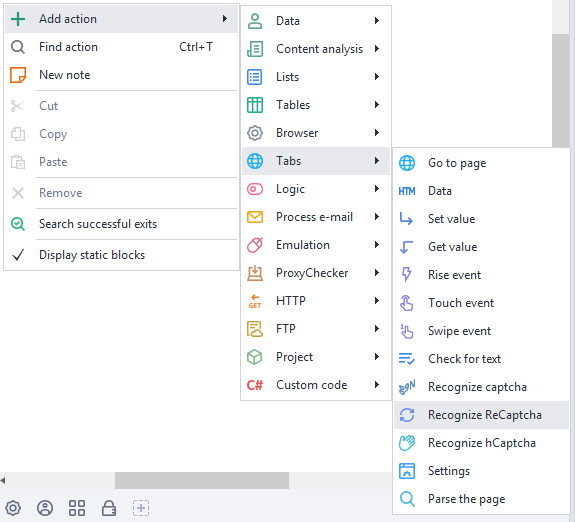
7. In the “Action Properties”, select the recognition module CapMonsterCloud.dll and set the following settings (if the variable does not exist, ProjectMaker will prompt you to create it automatically);
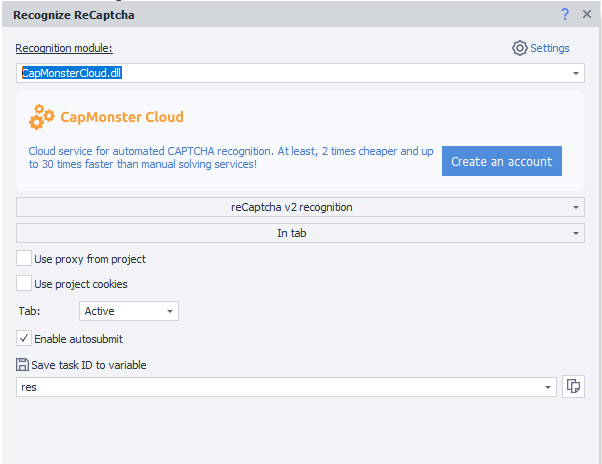
- Add the action for the submit button (the same way as we did for the empty window): “To the action designer” - “rise” - “click” - “Add to project”;
- Run the project and see what happens: an hourglass appears, this means that the captcha solving process has started.
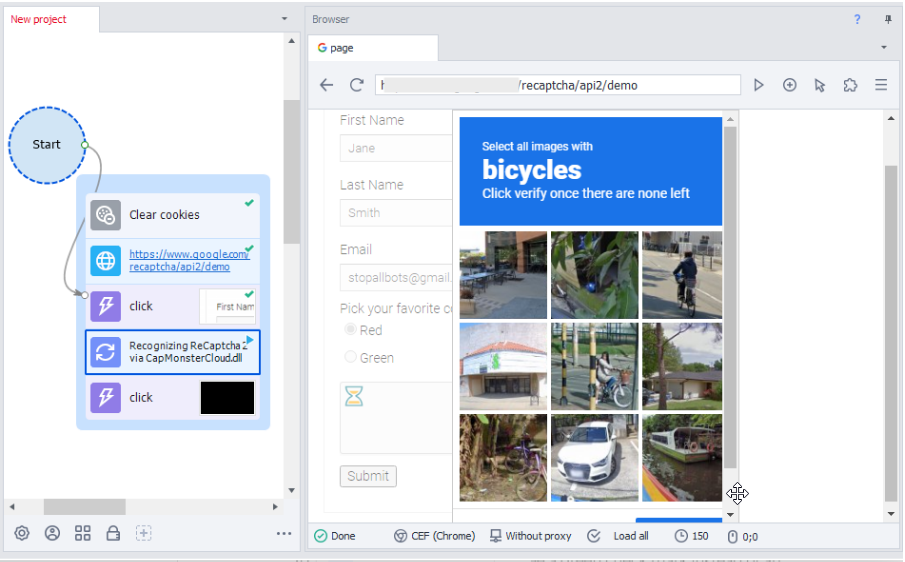
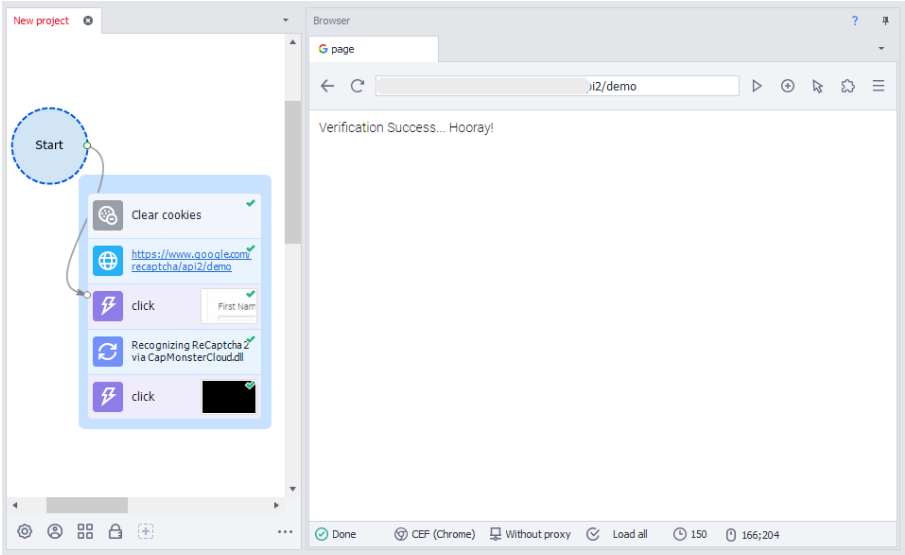
10. After waiting a while, you will see a green check mark instead of an hourglass - the captcha is solved. Then you’ll see the following page:
ReCaptcha v.3
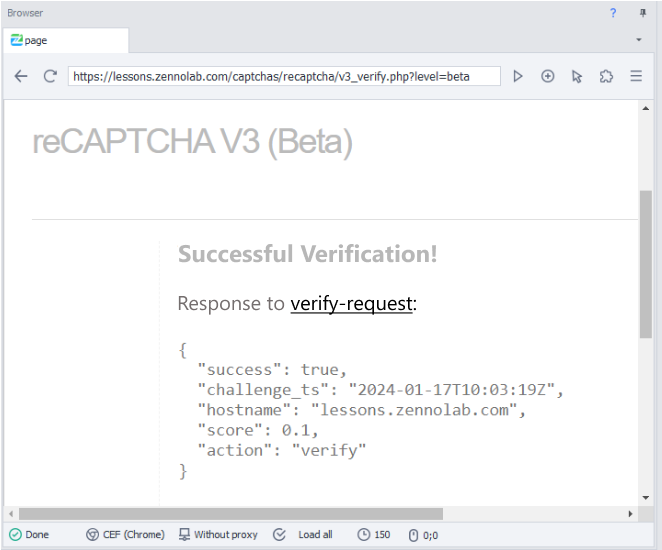
In the same way you can add actions for ReCaptcha3. This is a captcha that analyzes and determines from the visitor’s profile whether he is a person or a bot, and does not require the user to complete any tasks. You just need to add action and min score (visitor profile rating, for example, 0.1 is low, and 0.9 or 1 is high). If the indicator is high, it means that your profile is quite “warm”, there was activity from it that looks reliable. On the website https://lessons.zennolab.com/captchas/ you can test different types of captchas. Let's choose ReCaptcha v.3 for this purpose. At the same time, you will see the score of your profile.
- In ProjectMaker, add new actions “Clear cookies” and “Go to page” (paste URL: https://lessons.zennolab.com/captchas/recaptcha/v3.php?level=beta);
- Our next action will be “Recognize ReCaptcha”, set the following settings:
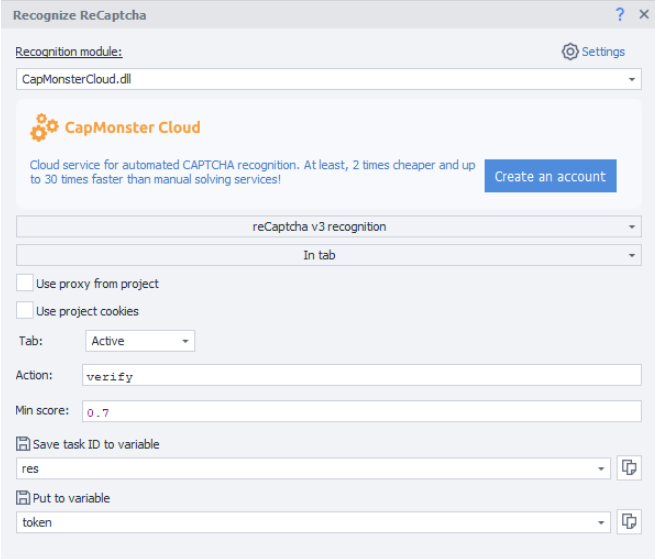
3. Run the project. If you see an hourglass and then a green checkmark – the captcha is solved;
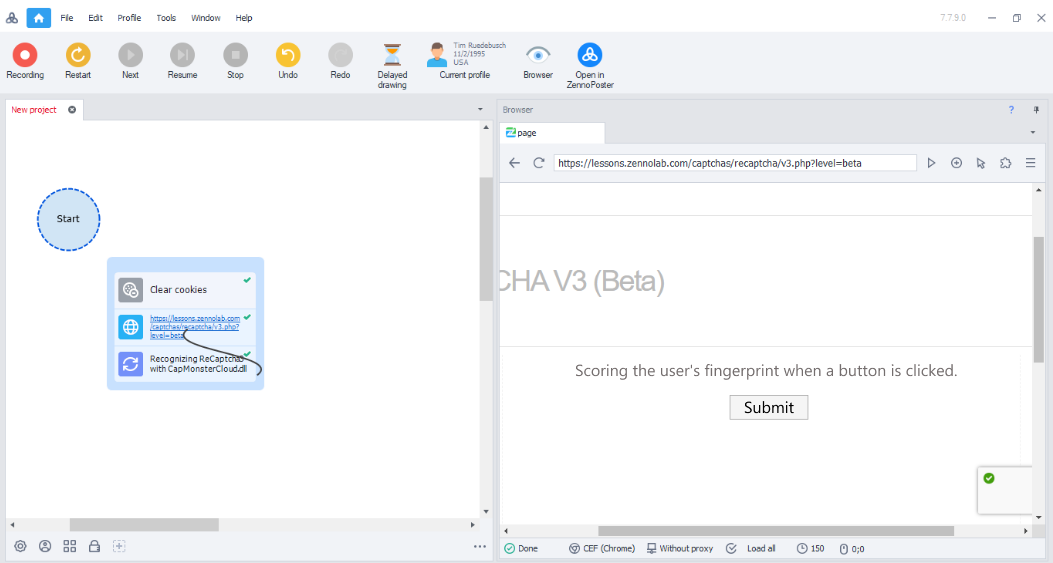
4. Now you need to add the action for the “Submit” button (“To action designer”, “rise”, “click”, “Add to project”) and run the template by pressing the F10 button:
You can also solve captchas not through the tab, but through a SiteKey. This is the key of the captcha itself, you can find it on the target site in the browser or in ProjectMaker in the “Web Developer Tools” tab. In the page content, find the line with sitekey and save the identifier:

Further actions:
- In the previously created “Recognize ReCaptcha” action, in the action properties, change the method to “Via SiteKey”, paste the sitekey and the URL of the site:
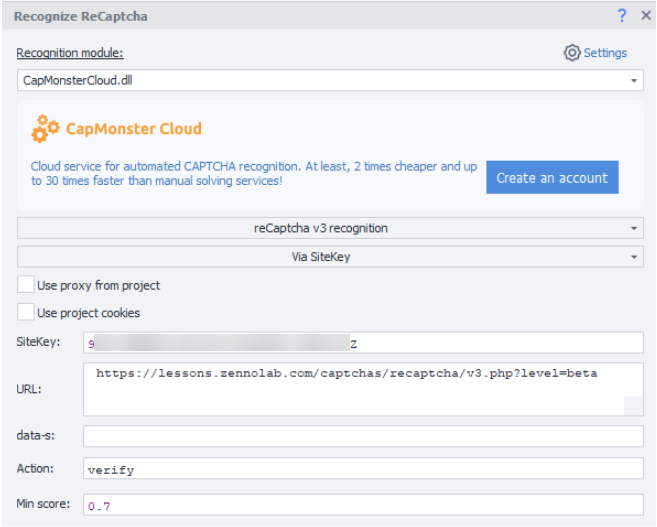
- Run the project, and the captcha will be solved as efficiently as by the “In tab” method.
Turnstile
Solving this type of captcha will be a little more difficult, because there is no ready-made action in ZennoPoster yet. This type of captcha, like ReCaptcha3, does not require the user to perform any tasks. Let's move on to creating the Cloudflare Turnstile template:
- Start the project with the “Variables Processing” action (“Add Action” – “Data” - “Variables Processing” or use the search), in the properties select “Set value” and enter your API key from CapMonster Cloud in the value field:
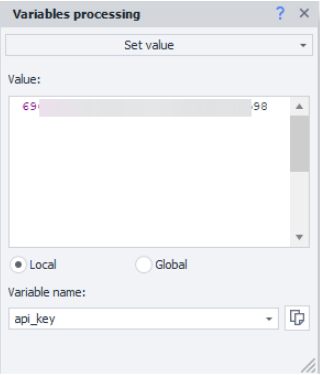
- Clear cookies and go to http://tsmanaged.zlsupport.com/;
- Set values for the login and password fields in the action designer:
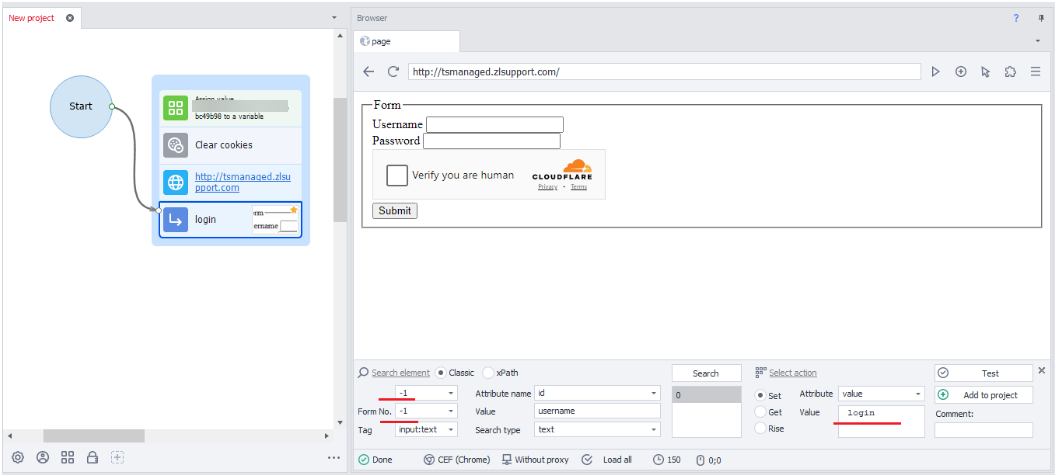
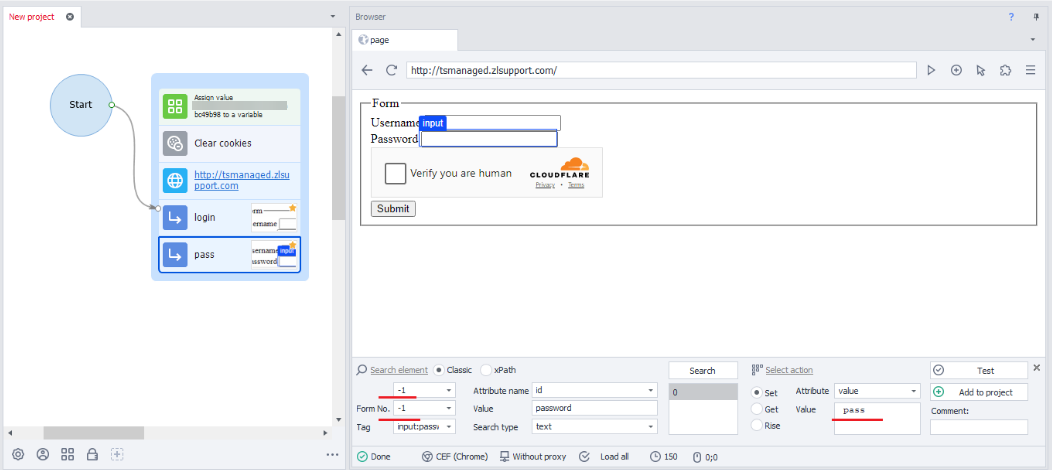
4. Next, you need to create a POST request to api.capmonster.cloud (“Add action” – “HTTP” – “POST request”) and specify the task in it. A request example you should take from the documentation https://docs.capmonster.cloud/docs/captchas/tunrstile-task, first you need to get the sitekey from the site where you need to solve captcha. This is how the fields in the action properties should look based on the task structure from the documentation and data from the target site (no need to change anything in the “More” tab):
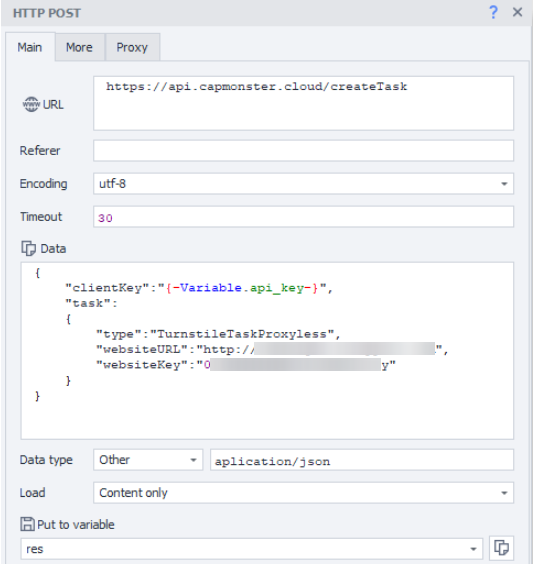
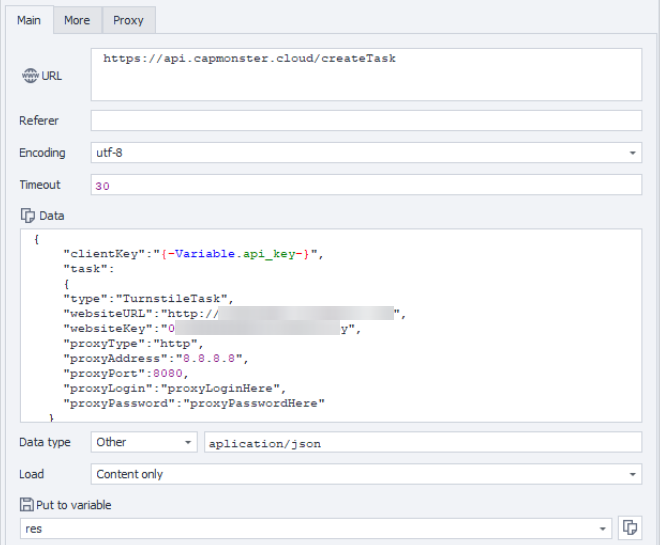
In this example, we do not use a proxy. If necessary, you can add the parameters of specific proxies, then you need to use the “TurnstileTask” task type:
5. Add the action “Processing JSON/XML” (“Add action” – “Data” – “Processing JSON/XML”), in the properties select “parsing”, type “Json” and then in the text field right-click and select “Set value from variable”, in our case this variable is called “res”:
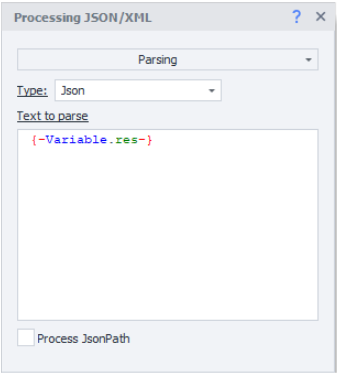
6. Add the “Processing Variables” action, set the value {-Json.taskId-} in it and create a new variable “tskId”, the task ID will be specified here:
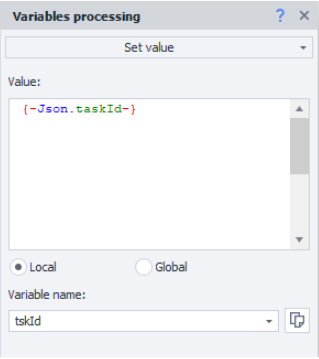
- Add a pause of 5 seconds;
- Create a new POST request to get the result:
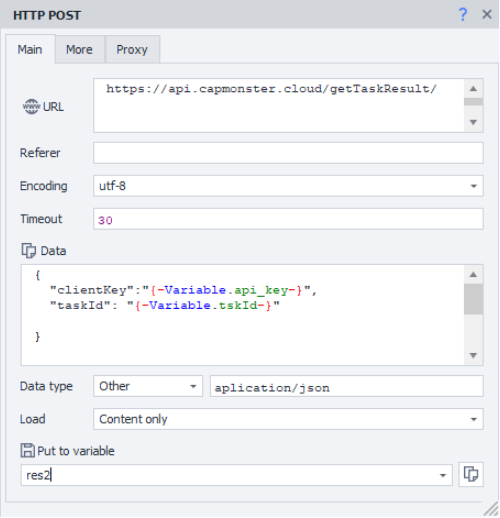
9. Next we parse the result:
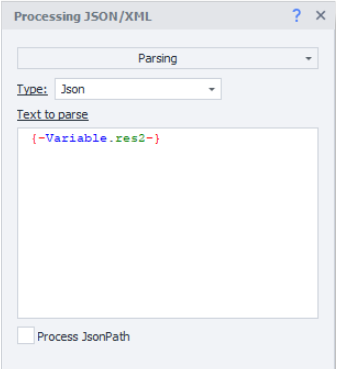
10. Now check the completion of the captcha solving process. Add two more actions in a separate block with logical “If” (“Add action” – “Logic” – “If”) and “Processing variables”. Set the value '{-Json.errorId-}'=='0' for the “If” and {-Json.solution.token-} in the action properties in “Variable Processing”, and create a “token” variable in it to store the received solution token:
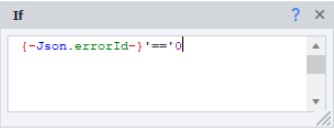
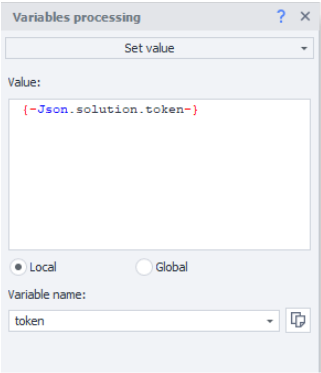
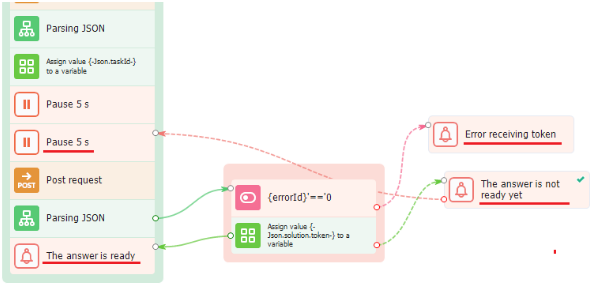
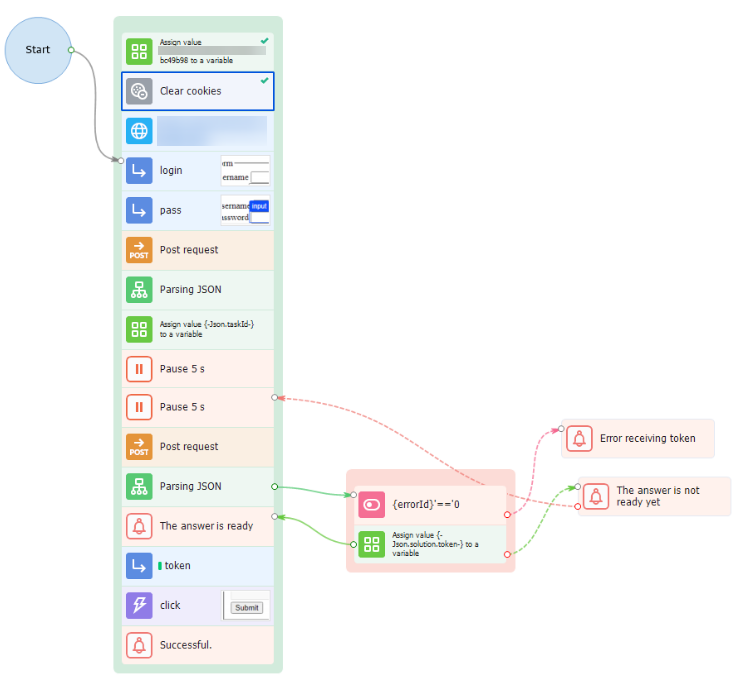
11. Set three notifications (“Add action” – “Logic” – “Notification”) in case of different outcomes and connect them with arrows with conditions (if the answer is not ready yet, you will need to put another pause of 5 seconds in the main block), here is how it should look like:
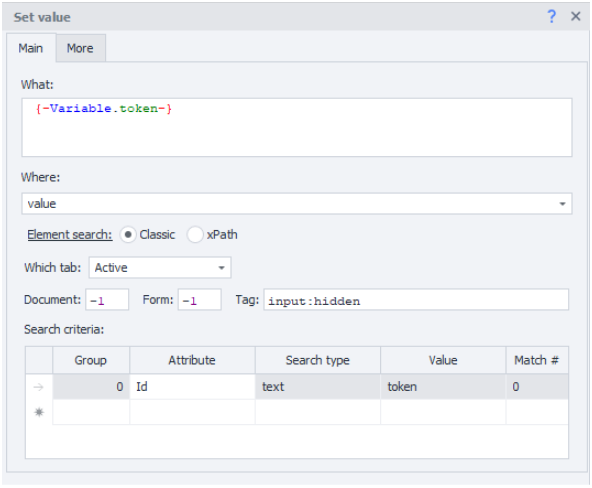
12. Continue working in the main block. Now you need to set the value of the token (“Add action” – “Tabs” – “Set value”), set the value of the “token” variable in the “What” field, add the “input:hidden” tag, in the “More” tab select “Emulation” – “Custom”, specify the remaining parameters:
13. Set the click on the “submit” button:

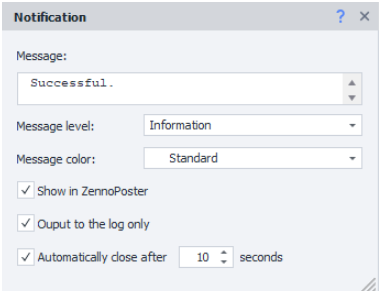
14. And set a notification about successful completion:
- This is how the complete template should look like in the end:
Start the project. If everything is done correctly, the captcha will be solved and a page with a successful result will open:

Here you can download the full template.
Tips
You can use any other site with a similar registration form and captcha (or no form at all). Experiment and try different approaches for your needs. If you did everything correctly, but errors appear at any stage of the project, the problem may be in the profile or IP address. Use high-quality proxies, you can purchase them in different places, and not in one package at once, warm up your profiles and accounts (you can use special programs or warm-up templates), then you will less likely to encounter complex captchas that your script and module cannot cope with.
Recently, it is not always possible to quickly and easily find it in an element’s code; site owners try to disguise it. In addition to searching in the browser and in developer tools, you can go to the site settings or open the “Traffic” window in ProjectMaker and try to find the key in the requests.
Some tips will also be useful:
- To reduce the load on the service and improve performance and task execution speed, you can use caching of tokens and solutions where possible, for example, with repeated captchas on one site;
- Make sure that your requests from ZennoPoster to the CapMonster Cloud API are configured correctly and comply with the requirements of the CapMonster Cloud documentation;
- Don't forget to track your CapMonster Cloud balance;
- View the logs to eliminate possible errors in the operation of the script and solving captchas; it would be a good idea to have a backup work plan in case of any problems;
- Use data encryption and don’t make your API key publicly available;
- Be sure to read the documentation, follow its updates and updates in general for ZennoPoster and CapMonster Cloud, read topics on the forum and news in the official Telegram channel.
So, in this article we examined the possibilities of using ZennoPoster and CapMonster Cloud, configuring and integrating it with the service, using examples we analyzed the solution of different types of captchas, created a whole template for solving Turnstile, delved into the process and the principle of operation itself. Now it has become more clear that the joint use of these tools, when configured correctly, is very effective: it helps you reduce time costs, opens up wide opportunities for automating a wide variety of processes, and makes working on the Internet more stable, easier and more enjoyable. We hope that this instruction with examples has helped you in solving your own problems and implementing personal projects!
Note: We'd like to remind you that the product is used for automating testing on your own websites and on websites to which you have legal access.